How to Make New York State Fair Style Chicken at Home

With the fate of the New York State Fair still waiting to be determined we got thinking about the great food that will be missed out on. You can keep deep fried Oreos, what we’re thinking about is the chicken!

There’s something that just tastes better in that chicken. You can go purchase the State Fair Sauce marinade but it just never comes out the same. So we tried a few things and came up with this recipe. The marinade is important, but what’s even more important is the smoke and heat. But don’t worry, we used a simple Weber grill with some store bought charcoal and a piece of maple wood.

First you’ll need a marinade. We made our own Italian Dressing but after trying this out a few times we realized that the marinade isn’t as  important as we thought. So if you want to skip this part and purchase an oil and vinegar based Italian Dressing that will work fine. We chose to make ours because it’s pretty easy and won’t contain any preservatives.

Basic Italian Dressing for Marinade:

1/2 Cup Olive Oil

1/3 Cup Red Wine Vinegar

1/4 Cup Apple Cider Vinegar

1 Tablespoon Honey

1 Tablespoon Kosher Salt

1 Teaspoon Dijon Mustard

1 Teaspoon White Sugar

1/2 teaspoon of the following: Dried Oregano, black pepper, garlic powder, onion powder

(Optional is fresh thyme and mint, rough chopped)

If you put all of this in a jar or tupperware you can give it a good mix. Let it sit at room temperature for an hour. We made double this recipe to use what we didn’t pour over the chicken for a pasta salad as a side.

How to Make New York State Fair Style Chicken

The Chicken Part

Cut a whole chicken in half. Don’t trim any skin or fat it’s not necessary. Just split it in two and put it into a one gallon ziplock bag.

Pour in enough Italian Dressing marinade to almost cover the chicken. Then arrange the two halves so the bag can lay flat. This will effectively submerge half of the chicken at a time. Put it in the fridge (*pro tip: put the plastic bag into a tupperware or on a sheet tray just in case someone accidentally pokes a hole in the bag. You and your fridge will thank us later!)

24 hours in the marinade is what the goal is. Flip the bag over to submerge the other side of the chicken every 8 hours.

The Grill Part

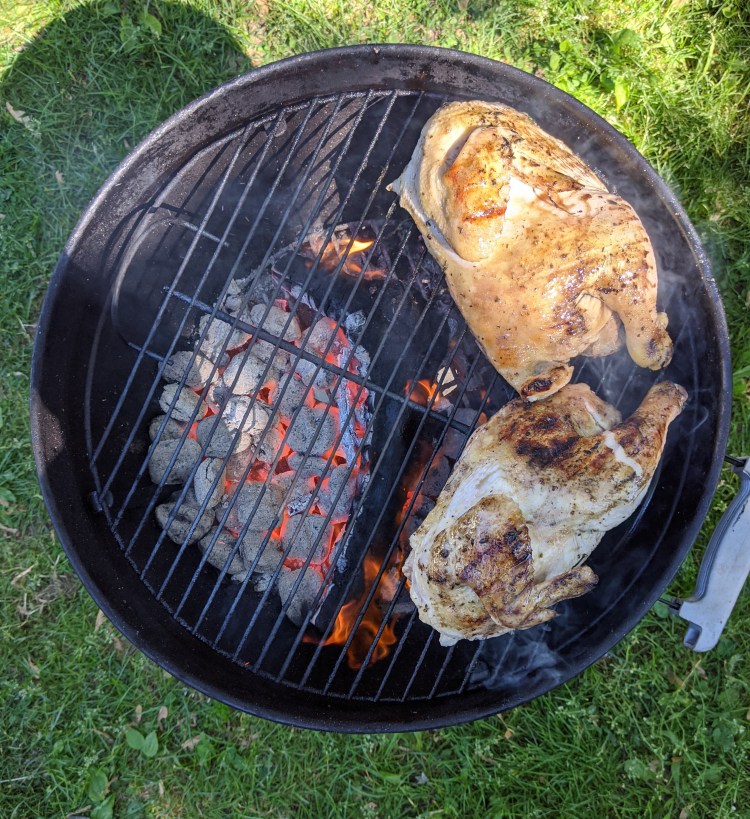
Get your charcoal started by a chimney and let them get hot. Once they’re red hot, place them on half of your weber grill. We got a large piece of maple from a neighbor and used that. We butted it up against the coals to provide extra smokey flavor. But if you don’t have a large piece of maple, you can purchase smaller ones. Make sure you follow the directions on the package.

IMG_20200613_161922

Once the coals and wood is in place, rotate the grill so the part that was over the coals is now not over the coals. Once you take the chicken out of the marinade, let it drip dry while you get the fire going. Once the grill is ready, place the chicken on the grill skin side down, but NOT over the coals. Make sure the damper is wide open and close the lid.

Keep close. With the oil and fat with the chicken there’s always the chance that it’s dripping on the coals and you need to put it out. You can always put a tin of water underneath the chicken to make sure it doesn’t catch. But if you don’t line it up right it can catch anyway.

At the 30 minute mark, flip the chicken. Put the lid back on and close the damper half way. Let it go for 45 minutes.

Open up the lid. The wood should be burnt out and the coals should be hot but not red not anymore. Put the chicken directly over the coals skin side down and put the lid back on for 10 minutes. Then flip the chicken and open the dampers. Let it smoke another 30 minutes.

IMG_20200613_162334

The best way to know if your chicken is done is to use a thermometer and get an internal temperature of 165 degrees. But once the meat starts pulling away from the bone it’s usually close.

Let it rest for at least 10 minutes if not longer before eating. We served our with pasta salad. It’s really good that day. But somehow ten times better the next day, cold out of the fridge.


The Quick Pickle

Pickling has a couple of purposes.

The first is to alter the flavor of the veggie to create something new, a compliment to a dish or sandwich. But the second part is to allow the same veggie to last a bit longer in your fridge or if you practicing canning and preserving, your pantry or cupboard.

This recipe is a quick pickle recipe that does not include canning. Canning is a separate art and takes some time and extra equipment that not everyone has. But you can use this quick pickling recipe and it only takes a few minutes to prepare.

As you’ll see in the video, we used three different types of vinegar. Honestly that’s not necessary at all. Any vinegar will work just fine but if you have different types of vinegar, combination of them produce slightly different flavors. Balsamic vinegar produces a fruity flavor, especially when sugar is added that enhances the red onion and makes it very sweet.

What You’ll Need:

Two medium size or one large Fisher Hill Farm Red Onion

3/4 cup vinegar

3/4 cup water

1/3 cup granulated sugar

2 heaping Tablespoons of Kosher Salt

What You’ll Do:

Put all that stuff in a pot and put it on low to medium heat. You don’t want it to boil, but rather get hot enough to dissolve the sugar and salt and help quicken the pickling process. Slice your onions as thin as you can and place them in a non reactive container. Once the vinegar solution has dissolved all the sugar and salt, pour it over top of the onions, lightly put the top on, let it get to room temperature and then put it in the fridge.

12 hours is best before you eat it, more is fine too. But if you don’t wait long enough the onions will not have time to macerate and the flavors will have yet to combine. We’ve used this basic recipe on:

Onions

Jalapenos

Cauliflower (chopped thin)

Carrots (chopped thin)

Green beans

Scapes

Asparagus

Parsnips

Fennel

Try it out! See what you think. Maybe you want it to be spicy and you could add some crushed red pepper. Or maybe you could use rhubarb and add allspice and clove to it. The options are endless and delicious.

Brighton Farmers Market Opens

The Brighton Farmers Market will be open this year, however it will be under a different set of rules. We are continuing our partnership with Flour City Bread and have partnered with K&S Bischoping Farms to bring you a one stop shopping Brighton Market experience. 

Here are the 2020 rules:

-Pre-order only (SNAP and FMNP included)

-First hour (9am to 10am) is Seniors ONLY

-The it moves to alphabetical (A through H — 10-11; I through P — 11-12; Q through Z — 12-1)

-One person per family, please.

-No dogs

-Social distance rules apply

The Brighton Market officially opens THIS SUNDAY May 24th and the link through the online grocery store for Flour City Bread is open starting NOW!

https://flourcitybread.com/collecti…/brighton-farmers-market

If you would like more info about the Brighton Farmers Market and the other vendors that will be there please use this link: https://brightonfarmersmarket.org/

Don’t know K&S Bischoping farms? They are the tent that has been to our left the last few years at the Brighton Market. They sell apples, berries, and lots more. You can check out more info here.

Thanks everyone.


Stewing Hen Tacos with Yogurt and Pickled Red Onions

We love our stewing hens for two reasons: taste and recycling. 

That might sound odd, but it’s the truth. Our stewing hens are the egg layers that no longer produce. They aren’t great for grilling like our other chickens, but it would be terrible to let that chicken go to waste. We wish we could let them live out their lives naturally, but it wouldn’t be cost effective, and we would run out of space. To our vegetarian friends it might seem cruel, but it’s the best way for them to serve two purposes.

The problem is, it’s not something that is normally sold in grocery stores.

It’s just not that common. So, we get a lot of questions on different ways to prepare these hens. The easiest way is soup, but no one wants to eat the a slightly different variation of soup every week. So we’ve come up with a few different ways to use them. Including this ragu which several people have tried and told us the whole family loved!

Here’s a different way; Tacos!

Who doesn’t like tacos! 

Here’s a video that explains the process. Below you’ll find the general ingredients that you’ll need.

What You’ll Need: 

1 Fisher Hill Farm Stewing Hen

1 Fisher Hill Farm Carrot

1 Fisher Hill Farm Red or White Onion

2 Ribs Celery

2 Cups chicken stock (homemade is best but store bought works)

Corn tortillas

Plain Yogurt

Cabbage (or kale or lettuce or whatever you can find/prefer)

Chili Powder, Cumin, salt and pepper – the rest is optional

What You’ll Do: 

Watch the video for the process. But a couple of footnotes:

-We’re working on a pickled red onion video and we’ll post that soon

-We use yogurt instead of sour cream because it’s easier to find locally and it’s better!

-Substitute flour tortillas if you prefer (We should do a flour tortilla recipe video!)

– We had leftover bacon from breakfast and so we chopped it up and included it

If you have questions or ideas or would like to see some recipes in video form let us know! We want to help! Thank you everyone for your support!

Learn to Break Down a Whole Duck

We have whole duck for sale and wanted to help our customers be assured that breaking down a whole duck is not that difficult to do! This video is a step by step tutorial to help you do that. 

We are sympathetic to our friends who do not eat animals and we do not want to be offensive in anyway, but this question has come up several times at market over the years. Some people would like to buy a whole duck or chicken but are unsure how to cook it other than putting the entire thing in the oven! It’s actually pretty simple and once you get chicken or duck down, pretty much all birds are the same.

You do need a good knife, one that is sharp and not too stiff. The knife used is this video was purchased at a local popular grocery store for less than $10 and worked perfectly. One thing that people often worry about is having to get through the bones of the bird. In this video, you’ll see that you do not necessarily have to saw through any bone.

A bird, a knife, a cutting board, and some patience and you’ll be a butcher in no time.

We plan on releasing some more videos as we get them on how to use this very same duck for the following recipes:

Crispy Skinned Duck Breast

Duck Liver Mousse

Duck Confit

The more we can help you use these products the better for both of us!

If you are reading this and you have a recipe that you use feel free to post in on social media and tag us. We love to know how you use what we’re growing and it helps to pass it along.

Thanks for reading and thanks for watching!